Wednesday, November 25, 2015

12 Tags of 2015--November Merry

Hello friends!  Happy Thanksgiving to those of you who celebrating in the United States.  Wow! Almost the end of the month, so I thought I better get crackin' on my November tag.  As always, Tim provides a wonderful tutorial on how he made his November tag on his blog. Here is my version.


 As you can see mine is a little different than Tim's, but I tried to capture all his fabulous techniques using the products I have.  I must confess, I gave myself a little early Christmas present--I spied one set of the Alphanumeric Thinlits at my local Hobby Lobby yesterday. Having tossed and turned all night for having passed them up yesterday, I was first in line at store opening this morning.

I just love Tim's tag this month, but I don't have the pumpkin Blueprint, nor do I have the linen stamp, and it IS already Thanksgiving, so I decided to move onto a Christmas theme. Truth be told, I much prefer the pumpkin and the linen, and doing the emboss/deboss technique was a bit of a bear on this tree.

TAG-MAIN

I pretty much followed Tim's tag to the letter with the following changes: Stamped image for background  is from his Grunge Cirque set, tree is from Christmas Blueprints set,  Distress stain sprays used are Fossilized Amber and Evergreen Bough, and Distress markers for coloring are Peeled Paint, Pine Needles, Evergreen Bough, Mowed lawn, Walnut Stain, Festive Berries, Tubled Glass, Squeezed Lemonade, Faded Jeans and Wild Honey. Although I actually have the cork, I thought Kraft Core in a deep green more fitting for my tag. Tag and Merry strip edged in Ground Expresso.


You might notice I got a little carried away with that foil....what fun that was!  I foiled the tops of the ornaments, the Merry strip, the star and even my Crinkle Ribbon! I couldn't get it on those tiny brads, so I just painted them with Tarnished Brass Distress paint. Only 2 on one side, because even though my letters are centered perfectly, thanks to Tim's trick, it looked off balance. The Mirrored Star is colored with Gold Mixative alcohol ink before adding the touches of foil.


I would like to enter this into the following inspiring challenges:
As You Like It Favorite Season and Why Winter is my favorite--it's a little colder, and it has Christmas!
Tuesday Throwdown #271 Shopping Spree I just went shopping for the dies this morning!
Thank you for stopping by today, and for everyone of your sweet comments!  I read and appreciate each one! Hugs and Thanksgiving Blessings!
Sara Emily
UPDATE:  How exciting!
Top 3

Sunday, November 22, 2015

Greetings at Christmas Tag

Hello again! I have been really inspired by Loll's Twelve Tags of Christmas event, and I had to get in the Closet and make one more tonight. I just can't seem to get away from a snowy theme this Christmas season, and so here it is again!


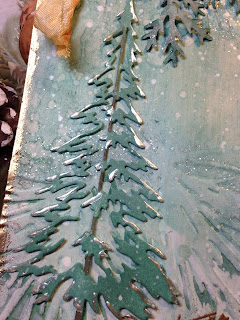
For my background I embossed a Ranger #8 tag with a Tim Holtz Texture Fade.  I've thrown out the packaging so I don't know the name.  I embossed twice--once at the top and once more toward the middle and bottom of the tag, using just the pine needles portion of the embossing folder. I only used two Distress inks on this--Evergreen Bough and Ground Expresso just around the edges.


 To get this variegated background, I applied gesso with a credit card and this left some areas uncovered. When dry, I blended on the inks. I wiped the raised areas with a damp wipe. Before drying, I flicked some water on to create a snowy background. Next came Ranger's Embossing Dabber and a sprinkle of Rock Candy Distress Glitter over the branches. (You might pick up just a tiny bit of the sparkle in this photo--this is very difficult to capture on my little camera phone without the benefit of sunlight.) Lastly I flicked on some watered down Picket Fence Distress paint.


I heat embossed my Vintage greeting (Flonzcraft) with Wow Metallic Gold Rich embossing powder using Versamark ink. I used my Ranger Embossing Dabber around the edges and heat embossed using the same powder.

I cut the Tim Holtz Woodlands tree from white card and inked with Evergreen Bough and Ground Expresso.  I lightly painted the branches with Liquid Pearls in White Opal and flicked on more Picket Fence.


The greenery is Tim Holtz Festive Greenery die, cut from white card and colored with Distress paints, Evergreen Bough and Iced Spruce, dried, then dragged through a puddle of watered down Pine Needles Distress ink.  I sprinkled with Ranger's Sticky Embossing Powder, heated and sprinkled with Rock Candy Distress Glitter. The metal snowflake charm is from my stash, and painted with Picket Fence and Pine Needles Distress paint. The seam binding is hand dyed with Tarnished Brass Distress paint. This color is really lovely and shimmery in real life.

I hope you like my Vintage tag!  I've had so much fun making it, I may just have to fashion all my Christmas cards after it this year! Please remember to click on any photo for a detailed view.


I would like to enter my tag into the following inspiring challenges:


Thank you for dropping by and for all your wonderful comments!  I read and appreciate each and every one of them! Hugs and Blessings!
Sara Emily

UPDATE: Thrilled! Honorable Mentions


Friday, November 20, 2015

Peace on Earth

Hello again, crafty friends! It's been a busy day in the Closet today, and I have another tag to share with you. Here in the United States, we celebrated Veteran's Day last week...a day when we honor those in our armed forces who protect us and keep our country free.

I made this tag (a little late) in honor of an old friend, Lt. Col. Richard C. Dornbrock, who served in the US Air Force as a navigator, but it is also to express my gratitude for all of our armed forces that protect our freedom. Dick sadly left us in 2010, and we celebrated his life in Arlington Cemetery in February of that year. He was like a father to me; we met years ago in Capon Springs, where we vacation every year.  He even made a special trip there the year I was pregnant with my twins to surprise me.  We loved to play golf at Capon, and he lovingly nicknamed my husband The Gorilla, because of his intense tee shots. When I was too huge to play golf that visit, he brought me milk and cookies and made sure I was comfortable. Oh, I miss him so much!


On to the tag...I started by spreading Ranger transparent texture paste through Tim Holtz Stars stencil. I made a puddle of Blueprint Sketch Distress ink mixed with spritzed water, and ran my card through that. I dried with my heat tool and then blended on more Blueprint Sketch and Antique Linen Distress ink and dried again. I wiped the stars with a damp paper towel to remove the ink. I love how the texture paste resists the ink.When I was through with the background, I cut it into the shape of a tag.


Many people associate red poppies with Remembrance Day because of the poppies that bloomed in the battlefields of Flanders Fields in World War I; their red color a symbol for the blood shed in war.In 1918 an American woman working in the YMCA Overseas War Secretaries headquarters distributed silk poppies during it's annual conference. From there, she worked to have the poppy adopted as a national symbol of remembrance, and two years later the symbol was adopted by the National American Legion Conference. This custom quickly spread to Europe. Some people wear white poppies to symbolize looking forward to peace rather than back at the sacrifice of those who fought. I chose to use white poppies on my tag to symbolize my desire for world peace in light of the recent horrific events that have quickly unfolded throughout the world in the passed several weeks. I embossed on red to honor those that did and still do sacrifice their lives for our freedom.


Stamps used are as follows:  Lady Liberty -- Inkadinkado, American Flag --  Imaginair Designs, and Poppies --  A Stamp in the Hand. The flag and Lady Liberty were inked with Jet Black Archival ink and colored using Distress inks and my water pen and blended with Antique Linen. The poppies were heat embossed with Ranger white embossing powder.  All images  were fussy cut and edged with Black Soot Distress ink. The Globe is a Tim Holtz Thinlit die cut, inked with Antique Linen.


I edged the tag  as well as Chit Chat stickers  with Black Soot distress ink. Gratitude is a metal piece from my stash.  I dabbed on Black Soot and Picket Fence Distress paints. The ribbon was given a vintage look with Antique Linen Distress ink, and fastened with a painted jump ring.

I hope my friend is enjoying Oreos, golfing, and reading lots of Harry Potter books in Heaven.  We miss you, Dick! A belated thank you to all of our veteran's--you rock!

I would like to enter this into the following inspiring challenges:
Use Your Stuff Challenge # 200 and A Blog Hop Celebrate I'm celebrating our veterans with a late Veteran's Day tag. You've inspired me to use some very old stamps and part of an old ornament! I'm using my stuff!
Thank you, once more, for visiting today, and for all your wonderful comments! Hugs!
Sara Emily


12 Tags of Christmas-Believe

Hello everybody!

Thanks to Pamellia, I heard about the party going on over at Stamping At Loll's  where Loll  is inviting us to make a Christmas tag in a mixed media style. Here's my last minute entry.


I used a Ranger #8 manilla tag, to which I applied three coats of gesso, drying between coats, pouncing the brush at the bottom to get some snowy texture.  I swiped my brand new Blueprint Sketch Distress ink pad on my craft sheet and spritzed with water until I got a good puddle, then dragged my tag through it.  I dried and repeated, then blended Blueprint and Tumbled Glass inks on with blending tool.  Before it dried I spritzed with water and dried with my heat tool.  There were some barely visible droplets left on the mat, so I flipped my tag over into that to get a little more visual texture.


I inked up a Tim Holtz image from his Merry Christmas set with Archival ink in Watering Can and rolled the stamp on the background to get a faded look to the trees. While they were still wet, I sprinkled on Frantage and heated from below to get the snowy look.

I die cut plain white card using my not so new, but never used Tim Holtz Woodlands Thinlits die. I dabbed the branches with Ranger's Embossing Dabber and sprinkled with Frantage, again heating from below to melt the powder.


The Ideaology Mirrored Star was dabbed with Snow Cap Mixative, and then lightly dabbed around the edges with Black Soot Distress paint.


The sentiment is from Tim Holtz Mini Handwritten Holidays set, inked with Archival, Watering Can, then embossed with Ranger silver Embossing Tinsel.


I hand died Crinkle Ribbon using Blueprint Sketch ink, and the grey seam binding is vintage from my stash. I dabbed on a little texture paste for "snow". The star and tree were adhered using Glossy Accents.


Here's one more look at my Christmas tag. As I was making it, I was remembering winters when I was a child and lived up north.  We used to get such wonderful snowstorms.  I'm sure it was hard work for my father, who was a dairy farmer. But for me as a kid, it was beautiful, and the pine forests were a magical place to be with the snowflakes floating down and resting on their boughs!


I would like to enter this into the following inspiring challenges:
-Use Your Stuff Challenge #200 and a Blog Hop Celebrate I am celebrating Christ's birth with my Christmas tag! Thanks for inspiring me to use my old stuff:  mirrored stars, stamp image and sentiment, vintage seam binding, frantage.
Stamps and Stencils Remember, Remember See my text for my memories!

Thank you for stopping by today and for all your lovely comments! You are so inspiring! Hugs and Blessings!
Sara Emily

UPDATE:  Honored to be chosen for Christmas and Mixed Media challenges

Thursday, November 19, 2015

Guest Designer for Frilly and Funkie! Oh! Christmas Trees!


Hello, crafty friends! I'm so excited today to be joining the girls over at Frilly and Funkie as Guest Designer for Cec's challenge theme "An Altered State"!  I decided to transform a yard sale Styrofoam cone, some old sheet music, jingle bells, and half pearls to make my Christmas trees. I ended up purchasing two additional cones from my local craft store, because everyone knows you can't have just one tree! I saw trees similar to these on Pinterest a long time ago, so I can't take credit for the idea.  But it was fun making them  in my own personal style.


These trees are going to be gifted to my daughter's voice and piano teacher for a table decoration for his Christmas recital, so I wanted to include a nod to music. Here's the before photos...


I started with my sheet music, which I cut into strips, then swiped on Picket Fence Distress paint randomly.  Next I added random areas of texture paste, and sprinkled with Rock Candy and Tumbled Glass Distress Glitters.  When dry, I rolled the strips on a skewer to make curls, which I cut about every 1/4 inch to make "eyelashes". You can see an example of this on the cone pictured above. The strips were hot glued around the cone in layers.  I wasn't happy with the brightness of the sheet music, although it is vintage.  I spritzed the finished tree with Vintage Photo distress spray to make it more vintage looking.  So much for my attempts at a glittery look!!!  To get some of the glam back I sprayed with Ranger Perfect Pearl spray, and gave it a good dusting of DecoArt Glamour Dust. These trees really sparkle in real life, but I just couldn't capture the glitz with my phone camera.


I followed this procedure for all three trees, however I grabbed the Rusty Hinge spray by mistake to spray on the smaller trees.  Because I was spraying outdoors on a terribly bright day, and therefore color blind, I didn't realize my error until I brought them inside! Yipes!  One vintage tree and two rusty ones!  Raise your hand if you've ever made that big of a goof before! Too late to start over, and cursing like a sailor, I marched those trees right back outside and gave them a blast first with Vintage Photo spray and then with my brand spankin' new DecoArt Shimmer Mister in White. Agggghhhh! It came out in globs! Oh, well...I just threw some Glamour Dust at it while the mister was still wet and called it done. (If anyone has tips for me on how to use my mister, I welcome your suggestions!)


While my soaking wet trees dried, I proceeded with the embellishments.  For the largest and smallest trees, I used half pearls as Christmas balls.  To alter them, I brushed on Ranger Multi Matte medium and shook on Distress Glitter in Tumbled Glass and Pumice Stone.  Once dry, I misted with Vintage Photo Distress spray.

For the medium sized tree, I altered some shiny gold and silver toned jingle bells.  I wanted the gold ones to appear silver and the shiny silver ones to have an aged look.  I used silver Mixative and Mushroom alcohol inks on the gold bells, and when dry, very lightly dabbed on Black Soot Distress paint.  I used Mushroom alcohol ink on the silver bells followed by the Black Soot paint. It's very subtle, but does give them a vintage feel. In the first photo the ones on the right are the "before"; the ones on the left, after I used the alcohol inks but before I added the paint.  The second photo is an action shot...Roger, the cat, took a swipe while I was photographing! Tee Hee!


The violins (maybe they're really cellos, but I want them to be violins) are from the Tim Holtz Little Things stamp set, inked with Jet Black Archival ink,  and blended with Vintage Photo.  I fussy cut them and edged in Walnut Stain Distress ink. Although I did not take photos from all angles, the embellishments continue around the trees, so they would be pretty from any vantage point.


"Sleigh Bells Ring" is part of a Close To My Heart stamp, which I inked with a marker, so I could just get the quote and not the entire image.  I stamped this on scrap card stock and hand cut the banner.  I  blended on Vintage Photo and Walnut Stain and flicked on some water.


"Christmas Carols" is part of a Tim Holtz Holiday Collections image, also using marker so I could isolate just the quote from the image.  Again, I hand cut the banner and inked as above.


The quote on the largest tree is from Momenta and inked in Archival, Jet Black. The flag was hand cut, inked with Vintage Photo and Walnut Stain and added to a stick pin I covered with Pumice Stone Distress Glitter.


Each tree is topped with  back to back Tim Holtz' Snowflake Rosettes and Mini Snowflake Rosettes. These were cut from white card stock blended with Tumbled Glass distress ink.  Once assembled, I spritzed the backs with Perfect Pearls spray in Turquoise and smudged a little on the center's, too. I swiped on texture paste, and while still wet, sprinkled on Rock Candy Distress Glitter.  When dry I smudged with a little Walnut Stain Distress ink.


Sadly, my trees were not inspired by cheerful Christmas memories of  when I was younger, because we did not celebrate Christmas.  I try harder to make my own family's Christmas really special with traditions and special decorations (and lots of them!), so my kids will have good memories.  I remember as children, we were not even permitted to sing the Christmas carols sung at school or participate in Christmas plays. I always felt so left out at this time of the year. So these trees are sort of a "So there, take that!" to those bad memories I have of Christmas time as a kid. Happily, I  have lots of good Christmas memories from when I was finally able to make them for myself! And I DO believe in Santa!


That's it for today!  I want to thank Cec and the girls at Frilly and Funkie for inviting me to join them today! Be sure to visit these talented artists to see their amazing transformations!

I would like to enter this into the following inspiring challenges:
-Use Your Stuff Challenge #200 and a Blog Hop! "Celebrate!" I reached REAL deep into my old stuff for the largest cone, the sheet music, all of the elements and for those sentiment stamps!
-Our Creative Corner "Topsy Turvy" My topsy turvy is the mistake I made using the wrong color spray to start and the unfortunate way the Shimmer Mist came out, which all just turned out fine in the end! I hope this makes sense!

Thank you for dropping in today and for all your wonderful comments! Hugs and Blessings!
Sara Emily

UPDATE:
Yippee!!!! Top Three!!
Featured button

Friday, November 6, 2015

Topsy-Turvy Autumn; Fall Leafing Up!

Hi Everybody!
Oh My! Lys at  Our Creative Corner has a challenge "Topsy Turvy" which is sure to scramble anyone's brains! If you read my title, you will see mine was a little scrambled by the time this went to post!  Here's my upside-down, inside-out, chaotic mess of an Autumn card.


One of my favorite memories as a kid was going up to the birch woods on the edge of our farm.  This was a magic place, especially in the fall, when the leaves would fall down like rain! The leaves always looked gold to me, against the bright blue sky.  My sister and I would lay on our backs for hours and let those tiny leaves drift over us. Unfortunately where I live now, we don't get that sort of autumn beauty, so I have to remember it through my artwork.

Let's start with the bottom layer.  I brushed Pitch Black Adirondack paint Dabber on white card, followed by my new DecoArt Weathered Wood Crackle Medium.  When dry, I brushed on Tumbled Glass and Faded Jeans Distress paints.


To do something totally topsy turvy, I decided to use the negative space of die cut leaves for my focal point.  I used a Tim Holtz Decorative strip die repeatedly on a piece of scrap paper.  I painted this lightly with  DecoArt gesso.  Once dry, I blended on Distress inks in Tumbled Glass, Faded Jeans and Chipped Sapphire and gave it a spritz of water and allowed this to dry naturally. Notice the darker blues are at the bottom.  I wanted this to be a dusky sky with the first stars coming out (upside down, of course).  I spritzed on my new DecoArt Media Shimmer Mister in white to the darker areas for stars.


Next, I wanted do do something out of order (Topysy Turvy) for the leaf backing.  I had a piece of leftover interfacing  (used for sewing) I had colored with various sprays last fall.  I ran it through my Big Kick with a Crackle embossing folder (Darice), which I had swiped Walnut Stain Distress ink over on the raised part to de-boss the crackle--just another topsy turvy element!


I made the frame using the negative space from a Spellbinder's die.  I used a TCW stencil and DecoArt Crackle paste to get the woodgrain, which when dry, I colored with Distress inks in Gathered Twigs and Walnut Stain. I added another negative "frame" cut from brown card left from a previous project. I heat embossed that with clear embossing powder and a Heidi Swapp wood grain image. I swiped on a little watered down DecoArt Media Fluid Acrylic in Titanium white to bring out the grain. To finish, I topped it with Frantage to look like a light frost.


I used Grunge Blocks to spell out Fall. Did you notice I turned one of the L's upside down? These were finished with Pitch Black paint Dabber and Tumbled Glass Distress paint. The word "leaves" was made from Tim Holtz  old Seasonal paper stash.  I cut letter blocks out and glued them on waste card board, cut them out, sanded the edges, swiped the edges with Tumbled Glass Distress paint and embossed randomly with Frantage. Typically I edge with a dark color, so this is one more Topsy Turvy thing on this card.


The leaves were a happy accident (more Topsy Turvy). My intent was to cover my negative leaves panel with clear UTEE.  I gave it a coat of gesso and while still wet, sprinkled on UTEE.  Duh, I left it to dry on a piece of copy paper, and then embossed with my heat tool, so it stuck to the copy paper. I tried pulling the leaf panel off, but it tore, and left these embossed leaves!  I blended over them with Distress ink--I think Wild Honey. I ended up having to fussy cut them out. Uggg! So much work went into them, I just had to use them!  To tie them into the project, I took a few die cut leaves, swiped them with Tumbled Glass Distress paint and embossed with Frantage.


There you have it! Fall Leafing Up! I'm sorry I had to explain myself, but I didn't want anyone to think I just made a bunch of mistakes--which I DID, of course.  But they all worked out in the end! The sun decided to go away before I could finish my photo shoot! The most carefully laid out plans sometimes go topsy turvy!


I hope you enjoyed this post and that you are not completely confused!  I would like to enter this into the following inspiring challenges:
Country View Challenges November # 33 The Colour Blue
Frilly and Funkie Let There Be Light! I used gradients of blue color to represent a sky at dusk and added first stars of night.
Stamps and Stencils Remember, Remember
The Artistic Stamper Fabric My fabric is the interfacing. 
Try It On Tuesdays Lots of Layers
Sweet Stamps November Anything Goes
Sparkle and Sprinkle November Anything Goes I used embossing powder on the smaller frame, UTEE and Frantage on the loose leaves.
Use Your Stuff Challenge # 198 Use Old Stash Grunge Blocks??? I got those 4 years ago! The paper stash-old; Spellbinders die-old, TCW stencil--old.

Thank you for dropping by today and for leaving your lovely comments! Hugs and Blessings!
Sara Emily

UPDATE: I'm honored!!!
Blog Challenge Winner Blinkie              Images intégrées 1