Monday, October 31, 2016

My Spooky Yard

Happy Halloween!
Welcome to my yard!


And when it gets dark....


Have fun Trick or Treating! (or crafting!)
Hugs!
Sara Emily

Sunday, October 30, 2016

12 Tags of 2016-October-Christmas Version

Hello again! I'm back with my second post today and with a second version of Tim's 12 Tags of 2016-October Remix tag. This time I've made a Christmas version. I thought the background technique really lended itself to the Christmas season, and couldn't wait to try out my new Dimensional Stars Thinlits die. Well, not new, but the first time I've used it.


Tim's October tag is really a knockout, and you can see his fabulous version here. I followed his instructions fairly well at first, but creativity started to take over, and I added a few of my own ideas. I used Tim's Festive Ephemera pack for the background, and used the Crazing as he instructed. I used Hickory Smoke and Picket Fence crayon to bring out the crazing, but added a spritz of Perfect Pearl spray and splattered Picket Fence Distress paint.


I had planned to use just the stars as the dimensional element, but thought I'd see what it looked like with a tree. I cut a Woodlands Thinlit tree from cheapo green paper, just as a trial, but because my machine didn't cut it through on the first pass, I couldn't poke the pieces all the way out. I liked the dimensional look, and decided to layer on the foil tape tree over it. Instead of the Black Soot, I used Picket Fence to color the foil tree.

I still used one of the stars and embossed it with Starry Night Texture Fade and colored with Tarnished Brass and Picket Fence Distress paints, following Tim's technique.


A Christmastime Remnant Rub and Word Band add interest at the bottom. I turned the Word Band over and used the back for another Remnant Rub. Picket Fence paint finishes off the band and brads.


A Typed Token highlighted with Picket Fence Distress crayon and some Crinkle Ribbon already colored from my stash--I guess it's Brushed Pewter.


Thank you, Tim, for another inspirational tutorial and challenge!

I am sharing this with these challenges:
-Allsorts Week # 387- Let's Get A Start on Christmas This is my first Christmas project.
-Die Cut Divas October is a Time to Emboss I embossed the star with a starry embossing folder.
Really Reasonable Ribbon Challenge #152-Tag, You're It Theme With Ribbon or Trim Thank you, Karen for inviting me to enter!

Thank you for your visit and lovely comments! They mean so much to me!
Hugs and Blessings!
Sara Emily

UPDATE: Yippee!

Shake Well

Hello crafty friends and visitors! I have one last Halloween card to share and then we'll move onto Thanksgiving and Christmas holidays. I made this one for my daughter who loves Halloween as much as I do.


For the background I used Tim Holtz' Batground stencil and transparent texture paste over a black gesso manila file folder cut to size. I spritzed with Perfect Pearls spray in Pewter and allowed to dry. Then I swiped with metallic wax rub in lavender. Finally, I rubbed randomly with Picket Fence Distress crayon and wiped off to leave it around the bat wings and to give a foggy look to the background.


The frame is Tim's Ornate Frame covered with Grit paste and colored with Wilted Violet Distress ink and DecoArt Carbon Black Antiquing cream. "Boo" is Tim's Newsprint Alpha Parts colored with Distress crayon and left to dry. "Shake well" is from his Halloween Ephemera and the skeleton is his Day of the Dead stamps. I heat embossed with Black Glint powder and colored with Distress inks Wilted Violet and Frayed Burlap and shadowed with Distress Marker in Hickory Smoke.


The Halloween Type token is colored with more Picket Fence Distress Crayon. That's it for now--short and sweet--just like my daughter! Happy Halloween you all!


I am sharing this with the following inspiring challenges:

Thank you for dropping in today and for all your wonderful comments! I read and appreciate each one!
Hugs and Blessings!
Sara Emily


Friday, October 28, 2016

12 Tags of 2016-October

Hello, again! this is my second post for today! Making up for lost time! I finally finished my October tag for Tim Holtz' 12 Tags of 2016-October Technique Remix--this month's was a whopper, and I'm not completely satisfied with my results. But here goes...


I pretty much followed Tim's instructions to the letter, and even had a few of the products on hand! You can see Tim's creepy, but extremely well executed tag here. The uber talented Anne of Redanne came to my rescue on the Zombie! Thank you, Anne, for your generous gift! She saw a comment I left on Tim's blog mentioning I didn't have the die and sent me several sets! Perfect! I used a little of each of the different colors and embossed Zombie sets she sent to make my one crazy mixed up Zombie.


I have used Tim's Crazing medium before, but never got the results like I did this time, thanks to his great tip to judge if you have enough on the tag.


Isn't it yummy? I also loved Tim's tip on how to use that splatter brush of his! Usually I end up with paint everywhere except where I want it! This time, it's splatter perfection, and not a drop on me!


A few close ups to show the details. I used Emerald Creek's Hammered Metal embossing powder on the hair and eyebrows. Emerald Creek' Charred Gold embossing powder makes a great gold tooth. Fired Brick Distress paint mixed with gel medium, make the falling eyeball extra gross and the scars a little more fresh. A spider charm from The Funkie Junkie Boutique is colored with Picket Fence Distress crayon as are the Halloween token and word band. I tucked the spider inside the eye socket. Yeah, I'm pretty sick!


 Thanks for another great remix challenge, Tim! I had so much fun with this tag that I'm working on a Christmas version. Hope it gets done on time!


I'm sharing this with these fine challenges:

Thank you for stopping by (again, if you visited earlier today) and for all your lovely comments!
I read and appreciate each and every one of them!
Hugs and Blessings!
Sara Emily
UPDATE: Thrilled!


Have a Scream

Welcome back, crafty friends and visitors! Thank you for all your lovely comments on my Haunted Mansion and Altered Mirror; you really made me smile! Today, I have a much simpler project, but still just as fun to create! It may have been even a little more fun, because I was making it for a special friend--Niki of Pawsitively Creative Crafts. Her amazing creations were recently published, not once, but twice in "Just Steampunk!" and "Mixed Up" magazines, and I wanted her to know I was doing a happy dance for her!


If you want to see how I made this spooky wood grain background, please stop back on November 5 when I'll be posting a brief tutorial on this technique on another project. The text paper is from Recollections--Michael's store brand, and the bats are part of a gift package my super talented and generous friend Anne of Redanne. Thank you, Anne! I heat embossed them with Wow!  Black Glint embossing powder. I colored the text panel with Frayed Burlap and Wilted Violet Distress inks and stains.


My  September 12 Tags of 2016 was a winner, and one of the gifts I won from the one and only uber creative and generous Tim Holtz was these Day of the Dead 2 stamp set. Thank you, Tim and Mario! This festive frisky skellie was the no brainer choice for what I wanted to say. She is embossed in the same black glint powder, simply colored with Frayed Burlap and Wilted Violet Distress inks and fussy cut. The Oct. 31st and Have a Scream stamps are from Hobby Lobby and ere inked in Archival Jet Black. The Twisted Edge die cuts are another gift from Anne!! It was like Christmas, opening her package. Stay tuned for another post featuring another die cut gift from her.


Well, that does it for this card--super easy, but with lot's of creepy details! I hope Niki likes her card! Here's one of the magazines she was published in. I have to say, I feel like a proud Mama!


Here's another look at my card...


I'll be sharing this with the following challenges:
Scrapy Land Challenge #52-Halloween I used 2 Sizzix dies--Halloween Mixed Media and Twisted Edge.


Thank you for stopping by and for all your incredibly inspiring comments!
Hugs and Blessings!
Sara Emily


Thursday, October 27, 2016

Altered Mirror-Emerald Creek Dares- Falling Into Celebration

Welcome friends and visitors! Today I have an altered mirror for the Halloween portion of Emerald Creek Dares Falling into Celebration.  I used five different embossing powders to take this frame from yard sale cheap to Halloween chic.


This is what the frame looked like before I got started. Well, actually it was quite dusty. I made sure to clean it well, so my products would stick to it.


Here's how I did it...
I started with the mirror itself. I stamped the Web and Hollo Doubt images in Staz On ink, masking the skull before stamping the webs.  Next I swiped on DecoArt Ultra Matte Varnish and while it was partially wet, I sprinkled on Clear Matte embossing powder sparingly. I heated the powders to melt, and while it was still hot, I gently wiped some of the powder and varnish away to give the look of a distressed mirror, and dabbed on Distress stain in Ground Expresso and spritzed with water. I used my marker spritzer and Walnut Stain 
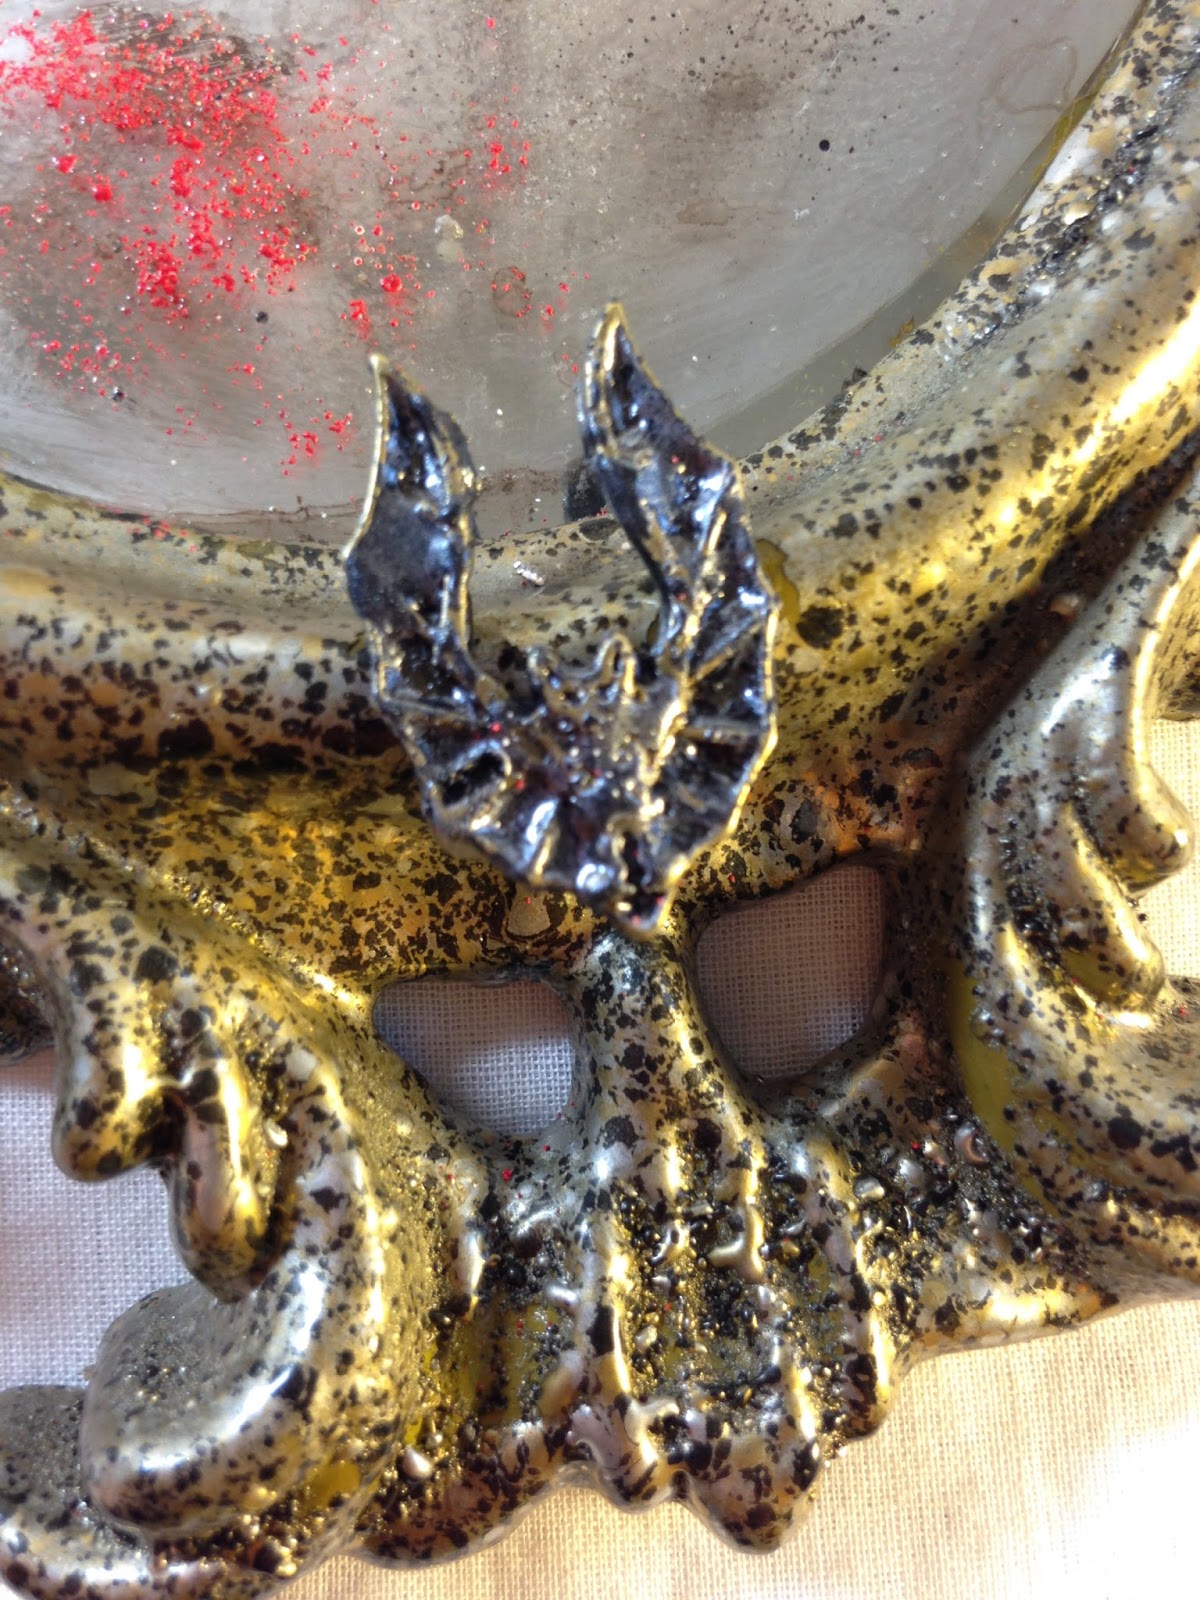
Distress marker for some more distressing. Finally, I flicked on some water and sprinkled lightly with Candy Red embossing powder and heated. This was an attempt at fresh blood splatter.  I didn't take any process shots for this part, so hopefully the close up shots will help take you through the steps.


To alter the frame, I applied Ranger Emboss It Dabber right from the bottle with a brush, and sprinkled liberally with Charred Gold embossing powder and heated carefully. I  did this in sections as the plastic frame has to cool down or else you don't get good adhesion. I love the depth of this rich embossing powder as it melts! Look at that beautiful coverage!


These Bat Charms are the perfect embellishment and I altered them to make them extra creepy. I snipped off the bail, spritzed with water and dipped them in Mercury Rising embossing powder.  I heated the powder to really bake it on. When cooled, I highlighted with a metallic wax rub and glued them to the frame.


The final touch was to add the spider. I heat embossed him with Ultra Puff White and highlighted with a darker metallic rub.


And just for fun...


Fun Facts: My altered frame measures approximately 8 x 12 inches and I paid 25 cents for it.

Emerald Creek Products Used:

Web stamp
Hollo Doubt Stamp
Bat Charms
Spider Charms
Charred Gold Embossing Powder
Mercury Rising Embossing Powder
Candy Red Embossing Powder
Clear Matte Embossing Powder
Ultra Puff White Embossing Powder

Other Products Used also Available at Emerald Creek:
Ranger Emboss It Dabber
Distress Marker
Distress Stain


That's it for today. I hope you will pop over to Emerald Creek Dares, and see what amazing inspiration my talented teammates have for you. I'm sure you will want to enter our 'Falling into Celebration challenge--you still have plenty of time to make your fall inspired project! There's a whopping $50 gift certificate to Emerald Creek Craft Supplies for the winner, and a badge and a generous shopping discount for the Special Mentions, and even a discount to the shop just for entering!

Emerald Creek Dares


I will be entering these fine challenges:

Thank you for stopping by and for all your fabulous comments! I read and appreciate each and every one of them!
Hugs and Blessings!
Sara Emily